Tuesday, June 7, 2011

Upstairs Bedroom Makeover - Progress

This is what the upstairs bedroom looked like before I started working on it. None of this furniture is mine, these are photos from when the previous owner still occupied the house.


Yikes, right? Obviously, the mural had to go. The bedroom is medium sized, but has low ceilings and is oddly shaped. I wanted to open it up and at the same time give it some personality and impact. The blue paint, even though it's light, does not open up the room the way you'd hope. And the low, angled ceilings make it look dark and gloomy. Just in case you missed the glow-in-the-dark stars stuck to the ceiling, here is a close up.


Of the two upstairs bedrooms, this one has the least amount of closet space. Since closet space is scarce in this house, I decided that this room should be the guest bedroom. I live near Myrtle Beach, so I expect to (more like would like to) have multiple guests in the future and I thought it would be nice to be able to sleep more than one person in this room. Lucky for me, the previous owners conveniently left two twin beds when they moved out.

In the unlucky column goes the framing around the windows. All three windows are in this condition. It makes me want to rip my hair out. Even though I love fixing this place up, I hate the part where I have to go back and fix all the stupid shit other people have done to it.  After much debate, I decide to just leave the molding alone and reframe the windows at a later date, i.e. when I have the money to do it.


Now, for the fun part! Seeing some progress! I agonized over what color to paint this room and finally settled on "Tranquility" by Valspar. I like this color so much, I'm going to use it in the master bedroom, too. I think that it makes the room look like a little jewel box and I love it. I'm really happy about the decision to take the wall color all the way up the angled portion of the ceiling. I think it makes room appear taller and less crowded.


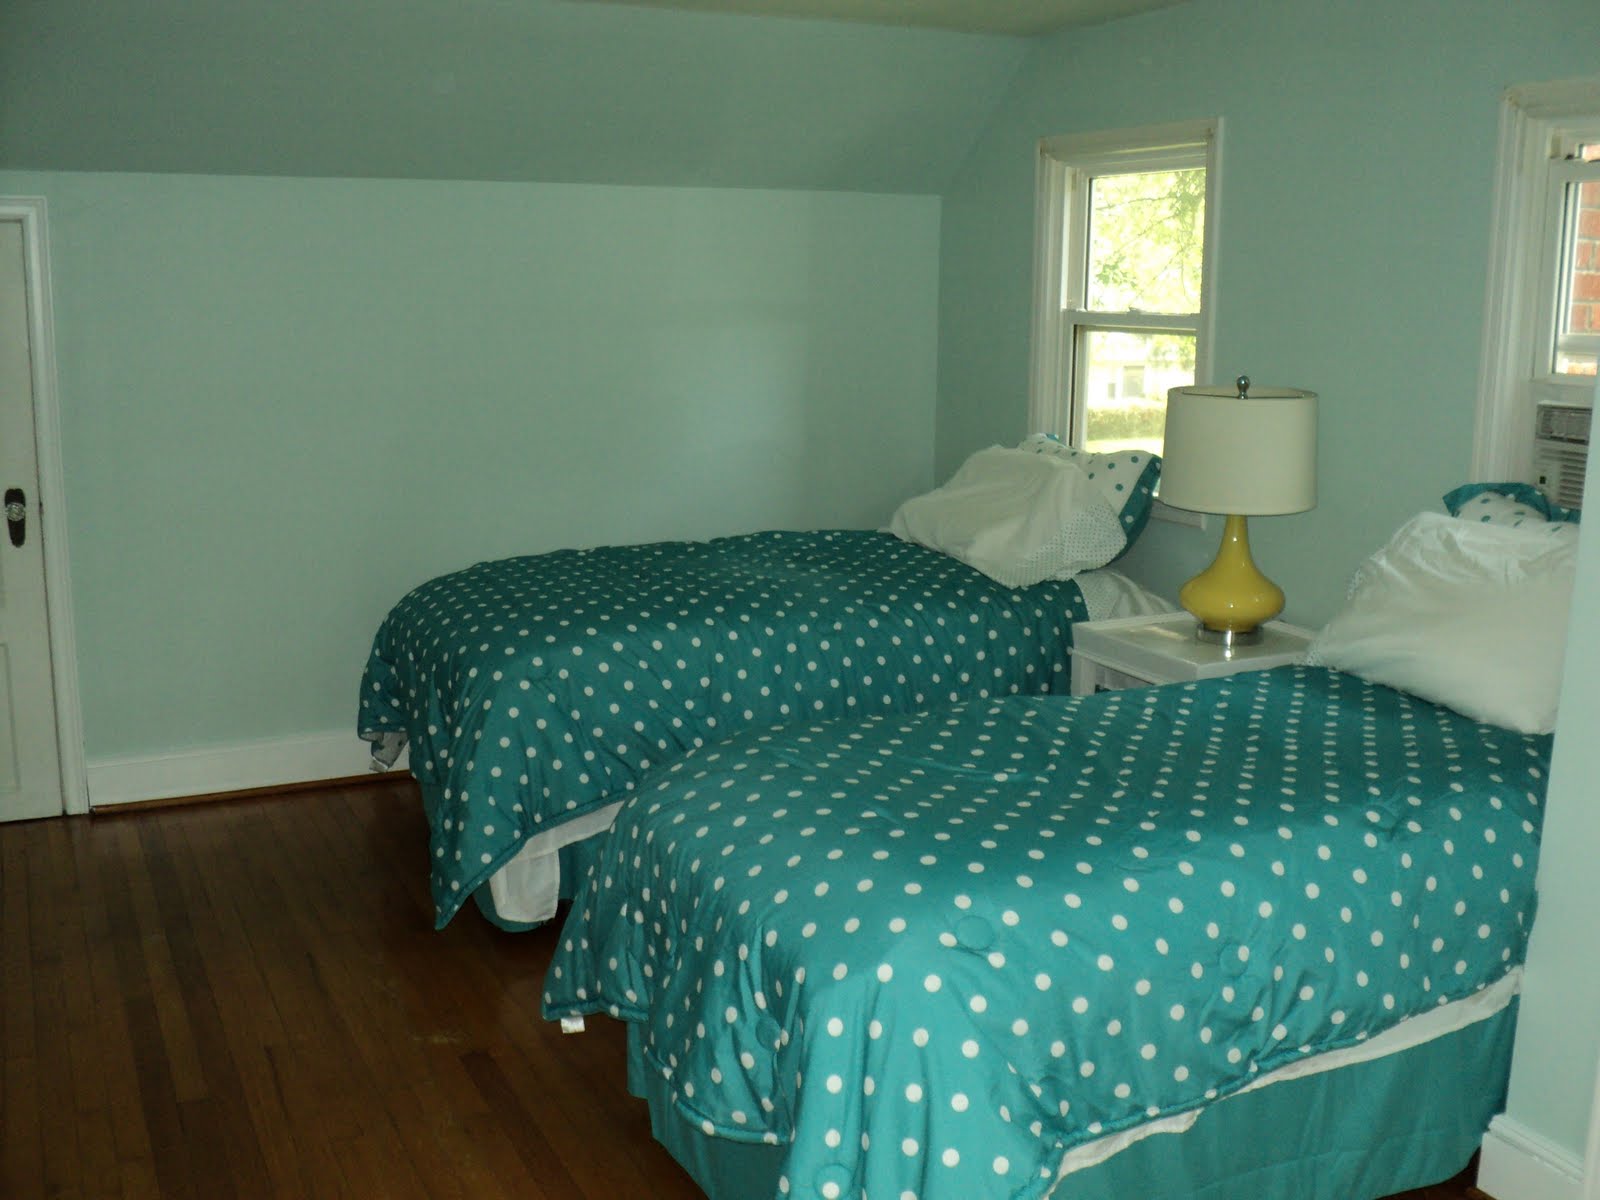
Although you can't see it in these pictures (which is probably a good thing, because it's not done yet, shhhh!), I painted the ceiling in Valspar's "Botanical Bath," which is a very pale green. I've never painted a ceiling before and I really like the effect. I'll post pictures that show the ceiling when I get around to replacing the flush mount light. Until then, you'll just have to trust me that it looks great. The trim color is Olympic's "Delicate White." I used the same color on the dresser and I'm going to use it throughout the entire house.  It's slightly shy of pure white - just enough to take the glare off.


The best part is that all of the furniture in this room was free! The beds were left by the previous owners (I just updated the bedding) and the dresser, too.  The bedside table was a gift from a friend's move. Both the dresser and bedside table were updated by yours truly.  You can read about the Bedside Table Makeover here and the Dresser Project here (I'll put a link in when it's finished).

It's not perfect, but it is definitely progress! Here is what is left on the to do list for this room:
  • Rip down the old molding around the windows, replace it with new wood and paint it.
  • Window treatments! I'm thinking roman bamboo shades and airy white curtains.
  • Trade out the old sockets (they've been painted over!) and light switch for new ones.
  • Replace the outlet covers with new ones that have a satin nickel finish, which goes really well with the new paint color.
  • Finish painting the ceiling! I really wanted to get it all done before I moved in the furniture, but things don't always happen the way that you want them to.
  • Replace the yellow lamp with one that has a glass base and a white shade.
  • Hang some art or a mirror on the walls. Really, my only big complaint about the room now is that it is a wee bit stark.
  • Strip the doors of their old paint and repaint them to match the trim. This, actually, is going to be another project all on it's own, which I'll get to (hopefully) before the summer is over.
  • Replace the ceiling light! I'm thinking of something like this to finish off the jewel box feel I'm going for.
The room is a long way from finished (is anything ever finished?), but I feel like it's come a long way from where it started. 

    Friday, June 3, 2011

    Sexy Back & Shoulders

    Vertical Push/Pull

    Super Set - 5 sets, 5 reps, 311 tempo, 90 seconds rest
    A1. Parallel Grip Pull Ups: BWx3, -40x5, -25x5, -25x5, -25x5
    A2. Seated Dumbbell Presses: 25x5, 30x5, 30x5, 30x5, 30x5

    Super Set - 3 sets, 8 reps, 301 tempo, 60 seconds rest
    B1. Pull Downs: 90x8, 90x7, 80x8
    B2. Seated Arnold Presses: 20x8, 20x8, 20x8

    Body Rock Style: 4 minutes, 6 rounds of 30:10 intervals
    C. Side Crunch
        Right Side: 14, 14, 14
        Left Side: 13, 14, 14

    Thursday, June 2, 2011

    Weight Workouts Are EASY!

    These are the first weight workouts that I've done in over 2 months. I held back a little the first day because I didn't want killer DOMS. Turns out I didn't get sore at all from it. Looks like the Body Rock workouts have kept me in excellent shape for traditional weight lifting workouts.

    Tuesday, May 31st - Horizontal Push/Pull

    Super Set - 5 sets, 5 reps, 311 temp, 90 seconds rest
    A1. T-Bar Rowns: 30x5, 35x5, 35x5, 35x5, 35x5
    A2. Flat Dumb Bell Press: 25x5, 30x5, 30x5, 30x5, 30x5

    Super Set - 3 sets, 8 reps, 301 tempo, 60 seconds rest
    B1. Cable Row: 60x8, 70x8, 80x8
    B2. Incline Dumb Bell Press: 20x8, 20x8, 25x8

    3 sets, 12 reps, 321 tempo, 60 seconds rest
    C. Buso Ball Crunches: 12x12, 12x12, 12x12


    Wednesday, June 1st - Light Legs/Arms

    Super Set - 3 sets, 10 reps, 301 tempo, 60 seconds rest
    A1. Leg Extensions: 50x8, 70x8, 70x8
    A2. Lying Hamstring Curls: 40x8, 45x8, 50x8

    Superset - 5 sets, 5 reps, 311 tempo, 90 seconds rest
    B1. Seated Dumbbell Curls: 20x5, 25x5, 25x5, 25x5, 25x5
    B2. Dips: BWx5, BWx5, BWx5, BWx5, BWx5

    Superset - 3 sets, 8 reps, 301 tempo, 60 seconds rest
    C1. EZ-Bar Curls: 26x8, 26x8, 36x8
    C2. EZ-Bar Lying Tricep Extensions: 26x8, 26x8, 36x8

    My back and chest didn't get sore at all, but my arms are pretty shot from yesterday. These workouts feel super easy after Body Rock. I'll have to push harder next time.

    Monday, May 30, 2011

    Temporary Training Split

    I cannot, for the life of me, imagine not doing any exercise at all. I understand that Body Rock is off of the table as it requires a ton of jumping around, etc. HIIT and Hills are off the table, too, since they are both rather hard on feet. Thankfully, my job doesn't require me to do a whole lot of running around, so it's not like work is going to get in the way of the healing my Plantar Fasciitis.

    Considering that I can, more or less, stay off of my feet, I see no reason why I can't do some traditional strength training, provided that I avoid lower body training that involves being hard on my feet. While normally I would loath being relegated to the University gym, it is summer, which means that the gym is relatively empty, and I can get my workouts done efficiently.

    Below you will find my new training split outlined and explained in detail. A couple of notes:
    • I've chosen some of these exercises specifically because they keep me off my feet, not because I think they provide optimum results.
    • I only do dumbbell exercises for my shoulders, otherwise they hurt.
    • Normally, I wouldn't do either of the leg exercises I have in this split, but my choices are pretty limited while I heal the plantar fasciitis.
    • Normally, I would not do nearly so much direct arm work, but as I can't really train legs, I need to do something to keep myself from going crazy.
    • There are 6 days of training in this split. 3 days of traditional weight workouts, and 3 days of traditional weight lifting using Body Rock type training intervals. I have NO IDEA if using this type of interval training with weights is going to work for me at all - this split may see major revisions soon.
    • At this point, I'm not sure how many days it will take me to complete the 6 days of training. To start, I think I might train 3 days in a row, take a day off, and repeat.

    Day 1 - Horizontal Push/Pull

    Super Set - 5 sets, 5 reps, 311 tempo, 90 seconds rest
    A1. T-Bar Row
    A2. Flat Dumb Bell Press

    Super Set - 3 sets, 8 reps, 301 tempo, 60 seconds rest
    B1. Cable Row
    B2. Incline Dumb Bell Press

    3 sets, 12 reps, 321 tempo, 60 seconds rest
    C. Weighted Crunches - various types

    Day 2 - Light Legs/Arms

    Super Set - 3 sets, 10 reps, 301 tempo, 60 seconds rest
    A1. Leg Extensions
    A2. Lying Hamstring Curls

    Superset - 5 sets, 5 reps, 311 tempo, 90 seconds rest
    B1. Seated Dumbbell Curls
    B2. Dips

    Superset - 3 sets, 8 reps, 301 tempo, 60 seconds rest
    C1. EZ-Bar Curls
    C2. EZ-Bar Lying Tricep Extensions

    Day 3 - Vertical Push/Pull

    Super Set - 5 sets, 5 reps, 311 tempo, 90 seconds rest
    A1. Parallel Grip Pull Ups
    A2. Seated Dumbbell Presses

    Super Set - 3 sets, 8 reps, 301 tempo, 60 seconds rest
    B1. Pull Downs
    B2. Seated Arnold Presses

    3 sets, 12 reps, 321 tempo, 60 seconds rest
    C. Weighted Crunches - various types

    Day 4 - Horizontal Push/Pull

    Super Set - 4 minutes, 6 rounds of 30:10 intervals, ?? reps, max effort
    A1. T-Bar Row
    A2. Flat Dumb Bell Press

    Super Set - 4 minutes, 4 rounds of 50:10 intervals, ?? reps, max effort
    B1. Cable Row
    B2. Incline Dumb Bell Press

    4 minutes, 6 rounds of 30:10 intervals, ?? reps, max effort
    C. Side Crunch

    Day 5 - Light Legs/Arms

    Super Set - 4 minutes, 6 rounds of 30:10 intervals, ?? reps, max effort
    A1. Leg Extensions
    A2. Lying Hamstring Curls

    Superset - 4 minutes, 4 rounds of 50:10 intervals, ?? reps, max effort
    B1. Seated Dumbbell Curls
    B2. Dips

    Superset - 4 minutes, 4 rounds of 50:10 intervals, ?? reps, max effort
    C1. EZ-Bar Curls
    C2. EZ-Bar Lying Tricep Extensions

    Day 6 - Vertical Push/Pull
    Super Set - 4 minutes, 6 rounds of 30:10 intervals, ?? reps, max effort
    A1. Parallel Grip Pull Ups
    A2. Seated Dumbbell Presses

    Super Set - 4 minutes, 4 rounds of 50:10 intervals, ?? reps, max effort
    B1. Pull Downs
    B2. Seated Arnold Presses

    4 minutes, 6 rounds of 30:10 intervals, ?? reps, max effort
    C. Crunches - various types

    Plantar Fasciitis

    Plantar Fasciitis is a condition where the flat band of tissue connecting your heel and toe (ligament) becomes irritated, torn, and inflamed. It is super painful and I have it in my left foot. In particular, the arch of my left foot hurts like, like I don't know what. Aside from tearing the ACL in my right knee, I've never dealt with something quite so painful.

    To heal Plantar Fasciitis, you are suppose to stretch it, massage it, ice it, take some NSAIDs, and basically stay the hell off of it. In other words - no killer Body Rock workouts. This is would probably be enough to make me cry if I wasn't already crying in pain. To keep from re-injuring it, you need some shoes (all ugly BTW) with killer arch support and to continue to do stretches to keep it loose and supple.

    Here is my plan to treat this stupid thing so that I can get back to Body Rock ASAP.

    Stretching - I'm going to do calf stretches on the stairs 3 times a day. I'm going to use my Gym Boss for this (at least I can still use my favorite toy), setting it for 12 rounds of 30:30 intervals. I'll stretch my left calf for 30 seconds and then my right calf for 30 seconds and repeat.

    At first I was dubious that calf stretches were going to help the bottom of my foot, but I've already done this once today and it makes my left foot scream in pain.

    Icing - After I'm done stretching it out, I'll ice it for 20 minutes using a small frozen water bottle. This is to help bring down inflammation. It also hurts like hell. I also have a cold pack that I'm going to bring to work with me so that I can ice it throughout the day.

    Massage - After perusing the Internet for a few hours I've decided that self massage can greatly speed up the healing process. While holding back my toes, I'll rub from the ball of my foot toward my heal. This will help loosen it up and increase blood flow. This is also hella painful, but the more you can take, the better it is and the faster it will heal. I'm thinking 2 times a day for 20 minutes is a good start - once in the morning and once at night.

    NSAIDs - I'm going to start taking Aleve 2 times a day to help with the pain and inflammation.

    Shoes - New workout shoes are definitely on the menu since I'm holding my old pair at least partially responsible for this debacle. I'm still researching at this point, but my preliminary research says that New Balance makes some pretty great shoes with the kind of arch support and fit that I need. I'm also going to look into getting some sort of orthotic inserts for my regular shoes. I've looked at buying special orthopedic shoes, but they are all so unbelievably ugly, I can't bring myself to do it.

    So, obviously, no workout today. Sucks.

    Sunday, May 29, 2011

    300 Rep Fat Burner Workout

    I only did half of the 600 Rep Fat Burner Workout and that was enough for me, thank you very much. The workout outline is below, and we were supposed to do it twice for a total of 600 reps. I did it once through at 20 reps each and then again at 10 reps. Even still, it took me 37 minutes and 29 seconds to complete. I feel like a big wimp too, since I probably spent about 1/3 of that time walking around the house panting and trying to catch my breath. This is definately one of those workouts that I'd like to do again in about 3 months to see what kind of improvement I can make.

    30 reps Jump Lunge Kick
    30 reps Side Burpee Knee Tuck
    30 reps Supergirl Squat
    30 reps Diving Knee Tuck
    30 reps Jump Jack Tuck
    30 reps 3D Push Ups
    30 reps One Leg Jump up
    30 reps Plank Lift Off
    30 reps Sumo Twist Crunch
    30 reps Ab Choppers

    Friday, May 27, 2011

    Game On! 300 Squat Challenge

    The Game On! 300 Squat Chellenge is perfect for me since I don't have my Gym Boss. I'm not even going to bother timing them. I'm just going to do them until my legs burn like hell and then take a break and repeat.

    Oh, I'm also planning on doing "The Nice GrASS Workout" today.

    Thursday, May 26, 2011

    HIIT Me Again

    Without my Gym Boss interval timer, I'm lost. This seriously sucks. Since I can't do a Body Rock workout, I'm stuck going to the gym. I never thought I'd see the day when going to the gym placed a distant second to working out at home. Weird.

    I've decided to do some HIIT. At least this way I'll get some decent EPOC.

    Here is the protocol I have planned for today. It's only slightly different from the previous protocol.

    TIME @ RESISTANCE

    WARM UP - 5 minutes

    60 sec @ 20

    120 sec @ 25

    120 sec @ 30


    INTERVALS - 18 ROUNDS - 18 minutes

    20 sec:40 sec @ 30


    COOL DOWN - 12 minutes

    180 sec @ 25

    240 sec @ 20

    300 sec @ 15

    Tuesday, May 24, 2011

    Right There Workout & My New Sandbag

    I've been waiting for my new sandbag, which I got from Rouge Fitness, to come in the mail so that I could do the Right There Workout.


    And yes. That is a 10 lb bag of rice you see in there.

    Here's the breakdown for today's 20 minute workout. (I know, long, huh?) The workout comes in 2 parts, each of which will be repeated 2 times.

    Part 1 - 4 minutes, complete the following exercise combination as many times as possible:

    1) 10 Jump Squats
    2) 1 Side Step Push Up
    3) 2 Diagonal Knee Tucks
    4) 1 Side Step Push up

    Part 2 - 6 minutes, 9 rounds of 30:10 intervals (changed these to 35:5 intervals for the second set), repeat the following 3 times:

    1) Lunge Pulse & Side Kick - left
    2) Lunge Pulse & Side Kick - right
    3) Diagonal Dead Lift with Sandbag


    As I mentioned in an earlier post, I am sans my Gym Boss, so I used an on-line interval timer.

    Here are my scores for today.
    Set 1
    Part 1 - 9 reps
    Part 2 - 30:10 intervals
       Round 1 - 7, 8, 14
       Round 2 - 8, 9, 15
       Round 3 - 8, 9, 16

    Set 2
    Part 1 - 8 reps
    Part 2 - 35:5 intervals
       Round 1 - 10, 10, 19
       Round 2 - 9, 9, 18
       Round 3 - 8, 9, 18

    Bedside Table Makeover

    I don't have a picture of this table before it was painted for the first time, but it was a dark wood with a geometric boarder on the top. It was a hand-me-down from my old roommate when I lived on A Street. I was unhappy with my original paint job. From afar it doesn't look so bad.


    But when you get up close? UGLY! Mostly because I'd layered primer and multiple coats of paint on it and it STILL had stains from the wood showing through! Here is a close up of the staining that I'm talking about. I've only attempted to paint wood furniture twice and this was once of those attempts. I'm hoping that this revamp will go better than previously.


    Like the trooper I am, I sanded it down to prep it for a re-painting. Have I mentioned how much I hate prep work? Here it is sanded down.


    Several cans of white spray paint, days, and coats of polyacrylic later, volia! It's going to go in the guest bedroom, you know, when that gets painted (roll laugh track).